
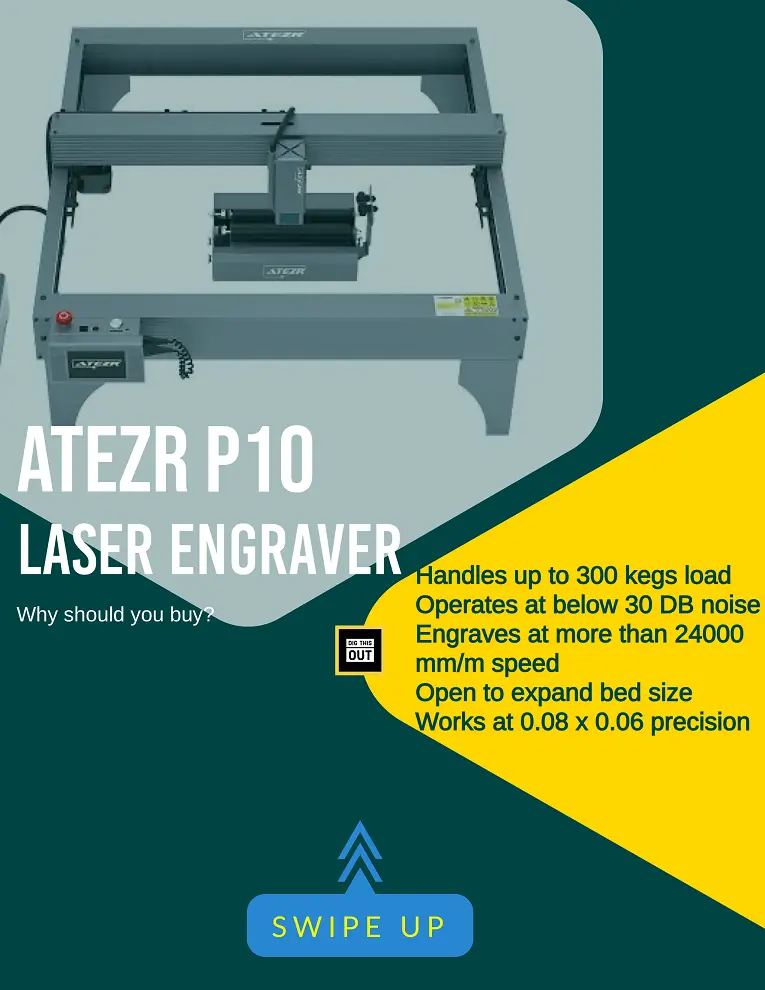
The Atezr P10 Combo Set is an innovatively designed laser engraving machine that stands as an embodiment of high-quality, precision, and efficiency. Built to transform your creative vision into reality, the P10 offers an array of features that not only cater to the needs of experienced craftsmen but also provide an easy entry point for beginners looking to delve into the world of laser engraving. From its unparalleled cutting ability, compatible system, automated roller, air assist function to the meticulously designed app, it is a testament to Atezr’s commitment to marrying advanced technology with user-friendly operation.
Atezr P10 is a entry level DIY laser engraver, which comes with less functionality than the professional CO2 laser cutters.
Overall Review
The Atezr P10 Combo Set Laser Engraving Machine is an impressive addition to any creator’s toolkit. The machine boasts an exceptional cutting ability, thanks to its dual laser module technology that expedites the engraving process by a significant 50% as compared to a 5W laser engraver machine. Compatibility with lightburn, lasergrbl computer operations, and Atezr’s exclusive Laser APP, coupled with offline engraving and cutting abilities, makes the machine easily operable and versatile.
The device’s automatic roller feature, which allows for the effortless change of structure to process different objects, is another game-changing feature. It enhances the machine’s functionality, especially when engraving cylindrical objects. Paired with the built-in air assist design that blows away hot smoke and reduces the temperature, the engraving and cutting process is cleaner and smoother.
The laser engraver’s engraving accuracy of 0.004 inches, facilitated by the compressed spot technology, is a testament to the P10 Combo’s precision. It can engrave and cut through a wide array of materials, including metal, stainless steel, ceramics, glass, and more, making it a versatile tool for a multitude of creative pursuits.
The Atezr P10 Combo not only boasts technical prowess but also champions user convenience and safety. The Atezr Laser App, integral lead screw design, and robust metal body design make it easy to use and maintain. The flame-retardant filter glass that blocks UV rays, precise anti-collision positioning provided by limit switches, and safe-to-use design ensure users can operate the machine safely.
Check Official Price of Atezr P10 Here
Check Price from Amazon Instead
Key Takeaways
- Unmatched Cutting Ability: The P10’s cutting ability is significantly enhanced by the dual laser module technology, making it efficient for any engraving or cutting project, accelerating your creation process.
- Versatile Compatibility: With its compatibility with various systems and offline operations, the P10 offers flexibility, allowing creators to work freely across different platforms.
- Automated Roller & Air Assist: These features contribute to smoother, cleaner engraving and cutting results, making the final product more refined and professional-looking.
- Precision and Versatility: The compressed spot technology allows for precision engraving, and its ability to work with diverse materials makes it adaptable to various creative pursuits.
- User Convenience and Safety: The P10 is designed with user convenience and safety in mind, with features like the Atezr Laser App, flame-retardant filter glass, and precise anti-collision positioning providing a safe and user-friendly experience.
Unboxing & Installation
Unpacking the Atezr P10 Combo Set Laser Engraving Machine was an experience that reflects the brand’s attention to detail and commitment to a superior user experience. The package arrived well-packed and secure, showing thoughtful care in safeguarding the equipment during transit. From the moment the box was opened, it was clear that Atezr prioritizes the customer experience and the product’s integrity.

Inside the box was a clearly written user manual, an essential tool for newcomers and seasoned users alike. This comprehensive guide laid out each step in the assembly process with crystal-clear instructions and helpful visuals, offering a hassle-free installation experience from start to finish.
One particularly impressive aspect was the organization of the screws. Each set was meticulously packed in separate packets labeled with steps, eliminating confusion and potential mishaps during assembly. This thoughtful detail not only made the assembly process straightforward but also a breeze to complete.
The total assembly time clocked in at an impressive 10 minutes. It’s worth noting that the gantry belts arrived taut, which may be intimidating for a novice user. However, the design cleverly incorporates options to adjust the belt tension, a critical factor influencing the smooth movement of the gantry. Adjusting the tension to a suitable level was an uncomplicated task, further speaking to Atezr’s user-centric approach.

The laser head, a critical component, was packed separately, ensuring its safe arrival. Installing the laser head was a straightforward process, even for a beginner, thanks to the user-friendly design and the clear instructions provided.
Overall, the unboxing and installation process of the Atezr P10 Combo Set Laser Engraving Machine is impressively seamless, well-organized, and quick. The level of care and thoughtfulness that Atezr has poured into the packaging and assembly process not only creates a favorable first impression but also instills confidence in the product and the brand. This experience, coupled with the machine’s powerful features and capabilities, would undoubtedly motivate any creator to consider adding the P10 to their toolkit.
Laser Quality
The Atezr P10 Combo Set Laser Engraving Machine, having gone through multiple testing phases, offers remarkable cutting and engraving quality that stands out in the realm of laser engraving machines.
The 12W blue diode laser, one of the P10’s prominent features, significantly contributes to this superior performance. The power of a 12W laser provides the ability to cut deeper and faster into materials, considerably reducing engraving time. The machine handled a variety of materials – including metal, stainless steel, ceramics, and glass – effortlessly. However, while the 12W laser is powerful and versatile, it may not be the ideal choice for materials extremely sensitive to high heat or for very intricate designs requiring lower power settings.

Check Official Price of Atezr P10 Here
A noteworthy feature that enhances the P10’s engraving and cutting quality is its precision – the ultra-fine compression spot size of 0.08 x 0.06 mm. This detail allows for highly detailed engraving, down to an accuracy within 0.004 inches. This level of precision is particularly beneficial when working on intricate designs where larger spot sizes might result in loss of detail. In essence, smaller spot sizes provide higher resolution, allowing for the creation of highly detailed work.
The built-in air assist is another essential feature of the P10 that contributes to its high-quality output. It works by blowing away smoke and debris from the cutting area, reducing the temperature and ensuring cleaner, smoother cuts. This feature not only enhances the quality of the final product but also protects the machine and extends the lifespan of the laser head.
Another distinct feature of the P10 is the rotary roller. This adjustable component allows you to engrave cylindrical objects with diameters from 2mm to 150mm, offering even more versatility and creative possibilities.
As for the speed, the P10 boasts an impressive maximum engraving speed of 24,800 mm/min. The brand’s constant research and development in laser technology have resulted in an upgraded algorithm that allows the machine to work faster and more efficiently. This translates to an increase in power by 40%–80% compared to other models, allowing users to obtain their finished product swiftly.
Overall, the Atezr P10 stands out in terms of precision, speed, versatility, and overall engraving and cutting quality. Its thoughtful features and advanced technology make it a powerful tool for both beginners and seasoned makers alike.
Wood Engraving Works
I recently undertook an engraving project on a piece of 6mm plywood using the Atezr P10, and the results were impressive, to say the least. I ran the machine at 60% power with a speed of 100mm/min, using Lightburn as the control software. This versatile and easy-to-use program allows for fine-tuning of engraving parameters and is perfectly compatible with the P10, which lends a considerable advantage to users aiming for precise results.

The image mode I used was Jarvis, a dithering mode that’s particularly suited for producing photorealistic engravings. The line interval time was set at 0.0849, which strikes a great balance between detail and speed, and with a DPI (dots per inch) of 299, the resolution was more than sufficient for bringing out the finest details in the image.
I conducted the engraving in a single pass, and the outcome was awe-inspiring. The P10 performed exceptionally well, reproducing every detail with incredible clarity and precision. The high level of detail is a testament to the P10’s ultra-fine compression spot size of 0.08 x 0.06 mm, which allows for high-resolution engraving, essential for replicating complex images on wood.
In conclusion, the performance of the Atezr P10 on wood engraving is truly top-notch. Its impressive precision, combined with the versatility of Lightburn software and the power of the 12W laser, makes this machine an excellent choice for anyone seeking professional-level results in their wood engraving projects.
Leather Engraving Works
Leather engraving can often be a challenging task, requiring both precision and delicacy. However, the Atezr P10 makes this process significantly more manageable, producing extraordinary results. To demonstrate the machine’s capabilities, I carried out an experiment, and the results were nothing short of impressive.
For the engraving, I set the machine at 10% power with a speed of 100mm/min. The interval was adjusted to 0.087 mm, ensuring the laser was hitting the precise points, and the image mode was set to Jarvis, excellent for creating detailed, photorealistic designs. I used a DPI of 291, an optimal choice for engraving on leather as it offers a great balance between speed and detail. The over scanning setting was at 2.5%, a useful feature to avoid burning the edges of the design during the transition of the laser.

One of the most notable features I used was the machine’s air assist function. This feature proved instrumental during the process. It protected the leather from fraying and heat damage while maintaining a better spot size for the laser. It also helped to remove smoke and debris from the cutting area, resulting in a cleaner finish and a healthier work environment.
The engraving was done in just one pass, illustrating the P10’s efficiency and potency. The outcome was astonishing. The machine replicated every detail precisely, and the engraved design had a clean, sharp look that made it stand out on the leather.
Now, as a pro-tip for those looking to engrave on leather using diode lasers like the Atezr P10, always run a test engrave on a small scrap piece of the material before starting on your main piece. This helps you calibrate the machine’s settings for the best results and prevents damage to your main piece. Also, keep in mind that leather can sometimes give off unpleasant fumes when engraved, so ensure you work in a well-ventilated area or use the machine’s air assist feature.
In conclusion, the Atezr P10 exhibits exceptional prowess in leather engraving. Its ability to handle intricate details and its accommodating features like the air assist make it a worthy investment for anyone interested in leather engraving.
Wood Cutting Experiments
Having personally put the Atezr P10 Combo through its paces, I can confidently affirm that its high-energy cutting is nothing short of exceptional. Tackling up to 18mm of wood and a staggering 30mm of acrylic board, the Atezr P10 doesn’t just claim superior performance—it truly delivers. In one instance, I managed to seamlessly cut through 12mm of wood and 8mm of black acrylic simultaneously. This impressive feat is made possible by Atezr’s use of the most advanced spot compression technology and innovative laser coupling methods.

But it’s not all about the raw power. The P10 Combo also stands out for its finesse, with the ability to meet daily cutting needs while also providing high-quality engraving. For creators who appreciate both brawn and beauty, this machine is a versatile, economical companion for a wide array of projects.
Air assist is another standout feature of the Atezr P10. It goes a long way in ensuring better precision and prevents the material from overburning during the cutting process. This greatly enhances the quality of your end product, whether you’re cutting wood or engraving intricate patterns on metal.
The compressed spot technology, reducing the spot area to 0.08 × 0.06 mm, is an absolute game-changer. This allows the engraving/cutting accuracy to fall within 0.004 inches. It’s not an overstatement to say that this greatly augments the P10 Combo’s cutting prowess, enabling it to work on a diverse range of materials including metal, stainless steel, ceramics, glass, and more.
For beginners entering the world of laser cutting and engraving, a pro-tip would be to always start with lower power settings and increase gradually based on the material and thickness. Remember, patience and precision go hand in hand with successful laser cutting and engraving. Don’t rush the process. Familiarize yourself with the equipment and its capabilities, and before long, you’ll be creating masterpieces with the Atezr P10 Combo.
Overall, my experience with the Atezr P10 has been nothing short of stellar. This machine combines power, precision, and speed in a package that’s user-friendly and built to deliver top-notch results consistently. If you’re looking to invest in a laser engraver, the Atezr P10 should be at the top of your list.
Work Bed
The Atezr P10 offers a substantial work bed size of 430 x 430 mm, a dimension that brings significant convenience to your larger artwork projects. This expansive workspace can accommodate a variety of engraving and cutting jobs. You’ll appreciate the convenience of not having to continually reposition your materials during a project. Moreover, its generous size allows you to work on multiple projects simultaneously, substantially reducing the time it takes to transform your creative ideas into tangible realities.
A workspace of this size opens up a multitude of possibilities. For artists or hobbyists, you can craft intricate and large-scale pieces of art, be it intricate engravings or extensive cut-out designs. For businesses, especially those dealing with personalized items, this size could mean producing batches of customized goods in one go—whether you’re engraving names on wooden keychains or logos on leather portfolios.
An important feature to note is Atezr’s optional bed extension, available at an additional cost, which effectively doubles the workspace. This is an enticing feature for users who need to process larger materials or fulfill higher quantity orders.
One tip for users to leverage this larger workspace is batch processing. Arrange multiple copies of a design within the workspace in a grid pattern to maximize the use of space. This approach allows you to engrave or cut several identical pieces in one operation, improving efficiency and overall throughput. LightBurn’s array function can assist in efficiently setting up your work.
In summary, the Atezr P10’s substantial workspace offers an array of opportunities for both personal creativity and business efficiency. Its size, paired with the option for further extension, makes it a versatile choice for any user.
Rotary Roller
The Atezr P10’s Rotary Roller attachment significantly enhances the machine’s versatility, and I was thoroughly impressed with its adaptability and ease of use during my testing.
One of the primary advantages of this attachment is the adjustable range. With the ability to alter the roller distance from a mere 3mm up to a substantial 115mm without any need for additional tools, I found this feature to be incredibly user-friendly. This flexible adjustment range allowed me to engrave objects of different sizes, offering an unprecedented level of versatility.
The 360° rotating rubber roller is another feature that stood out. Encased in a durable rubber material, the roller is less prone to wear and tear, providing consistent performance even after prolonged use. Furthermore, it offered excellent stability for my engraving projects, effortlessly rotating objects 360 degrees for all-around engraving.
Here’s a list of other laser engravers for Tumbler.

An additional component that adds to the Rotary Roller’s utility is the Goblet Assist Bracket. This clever design provided extra stability when engraving goblets, and the adjustable height between 5 and 10 cm caters to different goblet sizes. I found this exclusive feature to be a creative addition that can lend a personal touch to gifts.
Safety and aesthetics are both addressed with the exclusive frame design. The built-in main board and electromechanical machinery are well-protected against dust, even in the busiest of workshops. Not only does this design ensure a longer service life for the Roller Rotary, but it also enhances safety during operation.
Moreover, the convenience of the 15-second easy adjustment feature is noteworthy. The engraving diameter range can be manually adjusted swiftly without requiring any additional tools. Compatibility is another strong suit of this Rotary Roller, as it works seamlessly with 95% of laser engravers on the market.
Pre-installed and ready to use right out of the box, the Atezr KR laser rotary roller engraving module was a breeze to operate and install. Simply connect the engraver to the computer system and you’re ready to go.
The Rotary Roller’s specifications are impressive. With a compact size of 300*162*88mm and a weight of 1.5KG, it’s an efficient tool that won’t take up much space in your workshop. It supports various operating systems and control software, including Windows, macOS, Android, iOS, LaserGRBL, and LightBurn, ensuring a broad range of usability.
In conclusion, the Atezr P10’s Rotary Roller attachment is a top-notch accessory that augments the machine’s engraving capabilities. Its user-friendly design, adjustability, and robust compatibility make it an invaluable addition to any laser engraving setup.
Other Positive Sides
The Atezr P10 Combo is a laser engraving and cutting machine that carries a remarkable set of features, making it an incredibly compelling choice for any DIY enthusiast or professional maker.

One of its most lauded benefits is its compatibility with LightBurn, a premium software for laser cutters. The software offers an intuitive interface and extensive control over the engraving and cutting process, which is often found lacking in even high-end machines like Glowforge. This added compatibility significantly streamlines the user’s workflow, enhancing the overall productivity.
The Atezr P10 Combo is not just confined to the traditional means of connectivity. Its built-in Wi-Fi and TF card compatibility provide users with the freedom to work remotely. The proprietary Atezr Laser mobile app takes full advantage of these capabilities, allowing users to create designs anywhere, anytime, making the P10 Combo a truly flexible tool for your creative projects.
The machine’s structural design boasts an integral lead screw, extending its life by increasing precision and durability. The lead screw’s design significantly reduces wear and tear, leading to an increased service life and even cutting down the assembly time to just 20 minutes.
Safety and convenience are well-considered with the P10 Combo. The device features Flame-Retardant Filter Glass that effectively blocks harmful UV rays during operation, ensuring the user’s safety. Moreover, the inclusion of X and Y axis limit switches provide precise location tracking, avoiding violent collisions and improving overall machine longevity.
Further enhancing the machine’s durability is the use of metal in moving gears. This reduces frictional resistance, ensuring smooth operation, and improves work efficiency. The machine also features an innovative knob laser that offers precision adjustment to the tune of 0.01mm. This facilitates accurate positioning during engraving and cutting tasks.
The 12th generation motherboard in the P10 Combo sets a new standard for laser engravers in its class. With a built-in 256-bit color scale, it’s capable of producing highly detailed and contrasting engravings. Thanks to its efficient data transmission via USB and Wi-Fi, coupled with a modular design for easy assembly and component swapping, the machine is a breeze to work with.
For safety, an emergency stop button has been integrated, adding an extra layer of security while operating the machine.
Negative Sides
However, despite its impressive feature set, the P10 Combo does have a few shortcomings. The lack of a built-in camera can make precise material placement a bit challenging, particularly when dealing with multiple materials that need manual XY correlation. This may require a bit of patience and trial-and-error to get the alignment right. Moreover, the spot detector can be somewhat challenging to locate when working on black acrylic, which may cause minor delays in your workflow.
Also the the basic package does not contain a magnetic honeycomb bed which needs to be ordered at premium price. This is again great for someone already having a honeycomb bed that gives a chance to save over the spendings.
Nevertheless, when weighed against the multitude of features and capabilities it offers, these negatives are comparatively minor. Given its price point, the Atezr P10 Combo still presents an excellent value proposition, boasting features often found in more expensive machines. Its versatility and ease of use make it an attractive choice for anyone looking to delve into the world of laser engraving and cutting.
Atezr P10 Combo vs xTool D1 Pro
Below is a comparison table outlining the key features of both models:
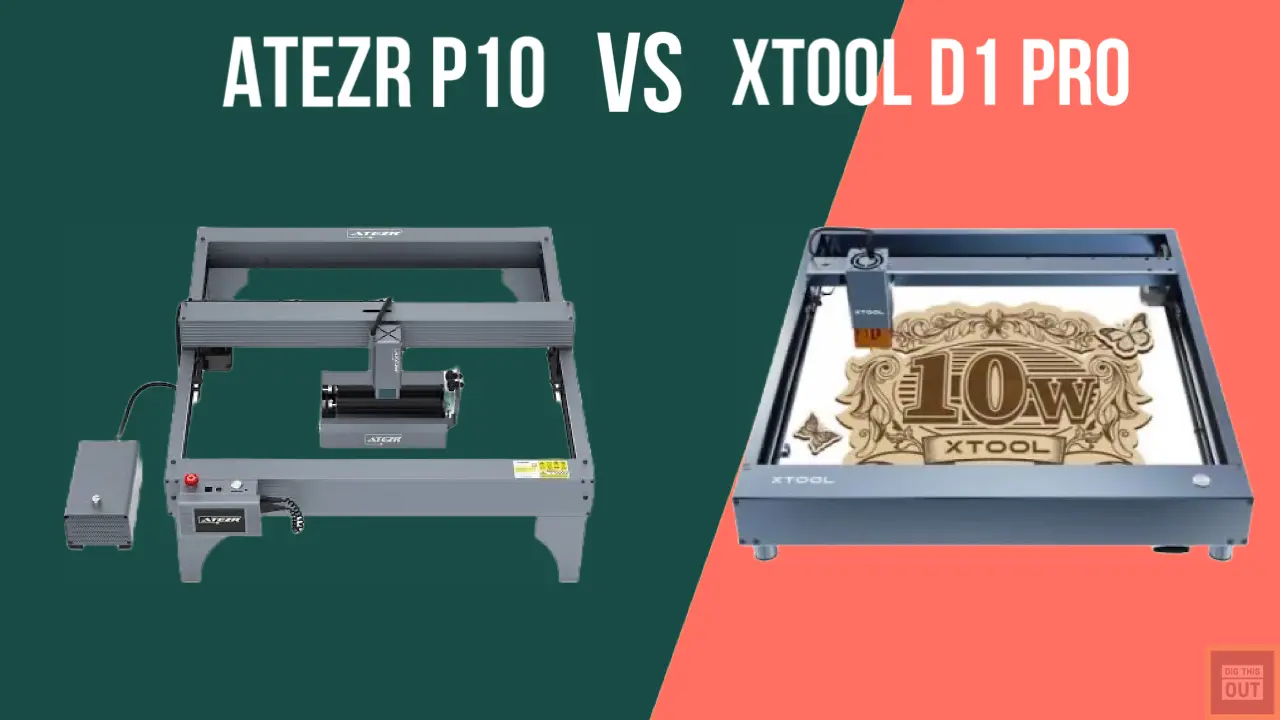
| Atezr P10 Combo | xTool D1 Pro | |
| Engraving Size | 430mm430mm (Expandable to 930430mm with extension kit) | 430400mm (Expandable to 930430mm with extension kit) |
| Machine Power | 60W | 60W |
| Laser Electric Power | 40W | 40W |
| Laser Module Output Power | 10-12W | 10W |
| Spot Size | 0.08mm*0.06mm | 0.08*0.06mm |
| Engraving Accuracy | 0.01mm | 0.01 nm |
| Laser Focal Length | 40mm | Not Specified |
| Laser Wave | 455±5nm | 455±5nm |
| Focusing Method | Fixed focus lever without focusing | Not Specified |
| Operating Systems | Windows/macOS/Android/iOS | Windows / macOS / iPadOS |
| Control Software | LaserGRBL/LightBurn | xTool Creative Space / LightBurn |
| File Type(s) | SVG/DXF/JPG/JPEG/PNG/BMP/TIF/CR2, etc. | SVG, DXF, JPG, JPEG, PNG, BMP |
| Connecting Interfaces | USB/Wi-Fi/TF Card | Wi-Fi, USB, Ethernet |
| Motherboard | 32-Bit Control Board With Wifi | Not Specified |
| Offline Display Screen | 3.5-Inch Color Touch Screen | Not Specified |
| Air Assist | Yes | Available at higher price |
| Rotary Roller | Yes | Available at higher price |
| Price | Check Latest Price | Check Latest Price |
| Noise Level | Less by 15 decibels | Not Specified |
In comparing the Atezr P10 Combo and the xTool D1 Pro, it’s clear that both machines offer substantial power and precision. However, the Atezr P10 Combo comes out ahead in several key areas.
Firstly, the Atezr P10 Combo has a sturdy metal body that promises enhanced durability and longevity. This superior build quality sets it apart and ensures it can handle rigorous, continuous use without compromise. In contrast, the xTool D1 Pro doesn’t specify its body material, which could potentially influence its durability and life span.
Secondly, the Atezr P10 Combo produces 15 decibels less noise than the xTool D1 Pro. This is a significant advantage, as a quieter operation not only creates a more pleasant work environment but can also be a key consideration for home or small office use where noise can be a concern.
Finally, the Atezr P10 Combo offers greater value for the money. It includes features such as Air Assist and Rotary Roller in the base price, whereas these are available at a higher cost in the xTool D1 Pro. Moreover, the Atezr P10 Combo is more economical, priced around $100 less than the xTool D1 Pro.
While the xTool D1 Pro does offer a few distinct features, such as Ethernet connectivity and a wider operating system compatibility, these do not outweigh the Atezr P10 Combo’s advantages in terms of build quality, noise level, and cost-effectiveness.
Therefore, if you’re seeking a laser engraver that combines power, precision, robust build, and value for money, the Atezr P10 Combo appears to be a more compelling choice over the xTool D1 Pro.
Atezr P10 vs P20
Based on the information, both Atezr P10 and P20 PLUS models share several similarities. They both have the same engraving size, spot size, engraving accuracy, laser focal length, laser wave, focusing method, compatible operating systems, control software, file types, connecting interfaces, motherboard, and offline display screen.
However, there are significant differences between the two models, mainly related to power and laser output:
- Machine Power: The Atezr P10 has a machine power of 60W while the P20 PLUS has a machine power of 120W. This means that the P20 PLUS has double the power of the P10, which may lead to faster engraving and cutting times.
- Laser Electric Power: The Atezr P10 model uses 40W of power, while the P20 PLUS uses 90W. The increased power usage in the P20 PLUS might lead to more powerful engraving capabilities, which can engrave harder materials more effectively than the P10.
- Laser Module Output Power: The Atezr P10 has a laser module output power between 10-12W, while the P20 PLUS ranges from 20-24W. The P20 PLUS’s higher output power may result in a stronger laser, allowing for more intense and faster engraving, particularly on denser materials.
How these differences affect the laser engraving experience:
Higher power (both machine power and laser electric power) usually allows for more rapid and deeper engraving or cutting. Therefore, the P20 PLUS could provide a more efficient engraving experience due to its increased power. In addition, the higher laser module output power of the P20 PLUS could also improve the engraving speed and allow for more detailed or intricate designs.
On the other hand, the higher power levels in the P20 PLUS might also result in increased energy consumption, which could be a downside for those concerned about energy use. Additionally, the increased power could potentially lead to faster wear and tear on the machine, though this would largely depend on how the machine is used and maintained.
Lastly, although both models have a fixed focus lever without focusing, which makes them easier to use for beginners, the P20 PLUS’s higher power levels might require more careful handling or safety precautions to prevent potential damage or accidents.
Maintenance tips
Maintaining your diode laser properly can significantly increase its lifespan, effectiveness, and safety. Here are some useful tips:
- Cleaning: Regularly clean your laser diode to avoid the build-up of dust and debris, which can affect its operation. Use a soft cloth or compressed air to gently remove dust from the diode, but be cautious not to apply too much force, which could potentially damage the laser.
- Heat Management: Excessive heat is one of the primary causes of laser diode failure. Always ensure that your laser diode has proper heat management systems in place, such as a heatsink or a fan. Allow your laser to cool down between uses to prevent overheating.
- Lens Care: The lens of your laser diode should be kept clean and clear. A dirty lens can compromise the laser’s focus, reducing its effectiveness. Use lens cleaning wipes or solutions specifically designed for optics to avoid scratching or damaging the lens.
- Inspect Regularly: Regularly inspect the laser diode for any signs of wear or damage. This can include any changes in the quality or intensity of the laser beam, odd noises, or difficulty in operation. Promptly address any issues to prevent further damage.
- Operate Within Specified Limits: Always operate the diode laser within its specified limits for power, temperature, and duty cycle. Running the laser too hard for too long can shorten its lifespan dramatically.
- Proper Storage: When not in use, store the laser in a clean, dry, and safe environment. Ensure that it is covered to protect it from dust or other contaminants.
- Professional Maintenance: Depending on usage and manufacturer’s guidelines, consider having your diode laser professionally serviced from time to time. They can thoroughly clean the unit, adjust alignment, replace parts, and make sure it’s operating at its best.
- Safety: Always follow safety protocols when operating a laser diode. This includes wearing appropriate safety glasses, operating in a well-ventilated space, and being mindful of flammable materials in the vicinity of the laser.
By following these maintenance tips, you can help ensure your diode laser continues to function effectively for a long time.
Lightburn Set-Up Guide
Setting up LightBurn with your laser engraver involves a series of steps that might vary slightly depending on the specific make and model of your machine. Here’s a general step-by-step guide to get you started:
Step 1: Install LightBurn Software First, download the LightBurn software from the official website. Be sure to select the right version for your operating system (Windows, macOS, or Linux). After downloading, install the software following the prompts on the installation wizard.
Step 2: Connect Your Laser Engraver Connect your laser engraver to your computer using the USB cable or Ethernet cable, depending on what your machine supports. Ensure your engraver is turned on.
Step 3: Setup in LightBurn Launch the LightBurn software. Upon first run, LightBurn will attempt to automatically find and connect to your laser engraver.
If it does not find it automatically, you can manually add your device. Click on “Devices” in the toolbar, then click on “Find my Laser”. If this does not find your device, click on “Create Manually” and select the type of controller your laser uses, which you can usually find in your laser engraver’s manual.
Step 4: Configure Settings After your device is connected, you’ll need to configure the settings. Set the working area size according to your laser’s specifications. You can also set the origin point of the laser. Usually, the origin is set to the front-left corner, but this can depend on your specific machine.
Step 5: Run Calibration Before you start engraving, you might need to perform a calibration test. This could be a simple square or circle. The goal is to ensure that the laser is firing correctly and that the measurements in the software align with the physical movements of the laser.
Step 6: Import and Set Up Your Design Finally, import your design into LightBurn. You can import various file types including SVG, DXF, AI, and more. Once your design is imported, you can adjust the settings for your cut or engrave. This will include the speed, power, number of passes, and the type of operation (cut, scan, image, etc.).
Step 7: Preview and Send to Laser Use the “Preview” function in LightBurn to ensure your design will be engraved as expected. Once you’re satisfied with the preview, click “Start” to send the job to the laser. Always monitor your laser while it’s running to ensure safe operation.
Remember, the exact steps and settings might vary depending on the specific model of your laser engraver. Always refer to your machine’s manual or manufacturer’s guidelines when setting up and operating your engraver.
Engraving Parameters
When engraving with a 10W diode laser, the power and speed settings will indeed vary depending on the material being used. It’s important to note that these settings can also be affected by the specific model of your laser, so the following should be used as a general guide and starting point. It’s always a good idea to perform test engraves on a small part of your material to ensure the settings are correct before proceeding with your full design.
1. Wood (light-colored, like birch plywood):
- Speed: 1000-1500 mm/min
- Power: 70-100%
2. Wood (dark-colored, like walnut):
- Speed: 1000-1500 mm/min
- Power: 70-100%
3. Acrylic (cast, clear):
- Speed: 1000-1500 mm/min
- Power: 70-100%
4. Acrylic (cast, black or colored):
- Speed: 1000-1500 mm/min
- Power: 70-100%
5. Leather (vegetable tanned):
- Speed: 2000-3000 mm/min
- Power: 30-60%
6. Paper/Cardstock:
- Speed: 3000-5000 mm/min
- Power: 15-30%
7. Fabric (cotton):
- Speed: 3000-4000 mm/min
- Power: 20-40%
8. Glass/Ceramics (with a laser marking spray):
- Speed: 500-1000 mm/min
- Power: 100%
9. Anodized Aluminum:
- Speed: 1000-2000 mm/min
- Power: 70-100%
10. Painted Metals (with a laser marking spray):
- Speed: 500-1000 mm/min
- Power: 100%
Note that you may have to adjust these values for your specific machine and material. The material’s thickness, color, and density can all affect how it reacts to the laser, and you may need to make several test passes to find the best settings. Also, keep in mind that laser safety precautions should always be followed. Always use appropriate laser safety glasses, operate in a well-ventilated area, and never leave the laser unattended while it’s running.
