
Infrared laser engravers (IR lasers) are becoming popular mainly due to their portability and ability to engrave metal and plastic. Such laser engravers are available at a price of around $1200 to $1500, varied by capacity and upgradability.
An infrared laser engraver stands out for being highly precise and powerful, traits that make it a top choice for metal and plastic engravings.
It’s preferred because the infrared wavelength cuts through materials CO2 or diode lasers can’t handle well, like certain plastics and metals.
Having worked with different types of laser engravers, I can confidently pinpoint why the infrared variation might be the best fit for certain laser engraving projects.
What is an infrared laser?
Straight to the point—infrared lasers pack enough punch to engrave on materials like certain metals which require more power than the engraving jobs possible with CO2 or diode lasers.
Lasers are distinguished by their wavelengths measured in nanometers (nm), and each type of laser interacts differently with materials. While a diode laser has a visibility component and works well for organic and soft materials, metals often reflect this light, making it a poor match.
The central hero of an infrared laser engraver is its wavelength, typically around 1064 nm. This shorter wavelength manages to be absorbed by metal surfaces rather than being reflected, a pivotal difference enabling marking actions that aren’t for CO2 (around 10,600 nm) or diode lasers in the visible spectrum.
It’s like trying to write on a steel surface with a normal pen and then switching to a sharp, indelible marker – the tools make all the difference.
Through my experience, let’s take an aluminum bike frame that needs a company logo. A CO2 laser might just bounce off the shiny surface, while an infrared laser engraver etches the design seamlessly, creating a lasting mark without damaging the integrity of the metal.
It translates the heat more effectively where it’s needed, causing alterations on a microscopic level. This dedicated targeting ensures precise results, vital for creating durable and accurate engravings on products that will often face much wear and tear.
Learn more on the differences between infrared laser and fiber laser.
Here’s an apple Airpod that we engraved with the infrared laser:

The above laser work was impossible using the diode or CO2 laser mainly due to the shiny coat of the workpiece. By nature, such plastics cannot absorb the laser power generated by the CO2 laser and also the shiny appearance reflects the laser beam before it gets absorbed by the material.
Using numbers to illustrate, infrared lasers operate with a spot size generally smaller than that of a CO2 laser. The crispness achievable can be compared to the detail of a fine-tipped pen (infrared) versus a standard marker (CO2). This means when you’re aiming for detail, like engraving serial numbers or intricate patterns, the infrared often outranks other options in definition and finish.
What is infrared laser used for?
Infrared lasers are most commonly used for engraving and cutting tough materials, particularly metals.
Having operated a variety of lasers, from the gentle glow of a diode to the invisible beam of an infrared one, I’ve found that useful for leaving a permanent mark on hard surfaces – acting much like an indestructible pencil. When trying to, say, label stainless steel kitchen utensils with a brand name or logo, other lasers might skitter across their shiny surfaces, but an infrared laser does the job easily.
Here’s an example of stainless steel spon laser engraving using an IR laser:
Think of the infrared laser much like a sharp chisel that can delicately inscribe symbols into stone slabs. But instead of a craftsman’s arm, its energy comes from light that interacts precisely with the material’s molecules. You’ll often see infrared in places like high-end manufacturing facilities where parts need identification marks or barcodes – this precision engraving ensures that a small scanner at the checkout aisle can read the produce codes off metallic cans like you and I read the morning paper.
Here’s a list of IR laser-compatible materials, for easy understandability, we included the CO2 laser-compatible materials as well.
| IR laser compatible materials | CO2 laser compatible materials |
| Stainless steel | Wood (including hardwood, plywood, and MDF) |
| Titanium | Acrylic (and other cast plastics not fit for infrared lasers) |
| Coated metal | Fabric (cotton, leather, felt, etc.) |
| Aluminum | Glass |
| Carbides | Coated metals (with special marking solution) |
| Polycarbonate | Stone (like marble and slate) |
| Certain other plastics (e.g., ABS, polyamide) | Rubber |
| Organometallic compounds | Ceramic |
When using infrared lasers, remember that this technique is known for its ability to mark bare metals directly without additional aids or treatments. Its popularity in engraving is primarily due to its precision and the cleaner finish it offers for industrial-grade materials.
On the flip side, CO2 lasers are masters at working with organic materials, making them ideal for crafting industries or businesses needing to engrave with intricate designs and personalized textures. While CO2 lasers can engrave on certain metals, they typically require the metals to have a special coating or treatment that absorbs the CO2 laser energy, given they’re not naturally as reflective to metals as infrared lasers are.
What is the difference between IR laser and UV laser?
Straight up, the primary difference between infrared and UV lasers lies in their wavelengths, which define how they interact with different materials and their uses in industry and technology.
In summary, the main differences are:
- Infrared lasers feature longer wavelengths, suited for cutting and engraving metals and hard plastics.
- UV lasers with shorter wavelengths excel in precision work on multiple materials with minimal heat production.
- In the USA lab, the infrared laser (operating near 1064 nm) is likened to a Swiss Army knife for demanding engraving tasks.
- UV lasers (100-400 nm range) lack the power for heavy-duty engraving but are unparalleled in fine, precise applications.
- UV lasers work as finely tuned instruments, like scalpels, rendering them perfect for jobs needing high precision, such as in electronics and medical manufacturing.
- UV lasers deliver concentrated energy pulses for high-accuracy material removal at almost a molecular level, minimizing damage and heat.
Infrared lasers have longer wavelengths than UV lasers, making them better for cutting and engraving, particularly on metals and hard plastics, while UV lasers, which have shorter wavelengths, are top-notch for precision work on a variety of materials without generating much heat.
Having tinkered with different laser devices in our USA lab, I can attest that an infrared laser is a bit like a Swiss Army knife for tougher tasks. Usually operating in the wavelength range near 1064 nm, it can handle heavy-duty engraving on materials like metals with relative ease while a UV laser, operating in the 100-400 nm range, doesn’t have the same muscle for that job.
But don’t underestimate the UV laser. It’s like a scalpel where the infrared is a sword—in high-precision tasks like electronics or medical device manufacturing where subtlety and finesse are crucial, that’s where UV lasers shine.
Since the pulse of a UV laser delivers energy in smaller, more concentrated doses, it removes material with exceptional accuracy, almost at the molecular level, without affecting the surrounding areas much. This means less damage, less heat, and a cleaner process. Just think about engraving leather that doesn’t tolerate excessive heat and you need maximum precision. In such cases, the UV laser makes the job easier.
Alternatively, a real-life example beams some light on the subject. Picture a complex circuit board in your smartphone: a UV laser could efficiently cut its delicate paths and resistors—a task for which an infrared laser’s approach could be too brutish, possibly overheating the components.
Can you upgrade your laser to an infrared module?
Yes, you can upgrade your existing laser machine into an infrared module only if it allows you to do so.
For instance, if you are using laser machines such as Glowforge, OMTech, or Atezr, then you cannot upgrade to an IR laser module since the companies have not yet launched their infrared upgrade.
Laser manufacturers such as xTool and Atomstack have already introduced a separate IR laser module so that you can replace the existing diode laser module with the new infrared laser module.
The upgrade would cost you around $400 to 500 depending on the laser power. But, make sure to reconfirm whether the new laser module is compatible with your existing frame. We tried installing the Atomstack infrared module into Atezr’s agntry and we couldn’t do that.
What are the best-infrared laser engravers in the market?
Below are the top infrared laser engravers as per our hands-on tests and experiments:
- xTool F1 (Best Overall)
- LaserPecker 4 dual laser (infrared + diode)
- xTool 1064 nm infrared module (for upgradation)
- Sculpfun IR 2 (a 2W IR laser module)
Why did we pick the xTool F1 as the best of all?
There are some reasons behind the verdict. Here are the justifications of why the xTool F1 stands out among all the other choices:
- The F1 is a portable laser that offers the flexibility to engrave anything.
- The F1 runs 10 hours in its power station allowing you to carry and engrave anywhere.
- It engraves at an insanely faster speed of 4000 mm/second.
- Its preview speed is faster than others allowing you to ensure the finest position.
- The xTool F1 engraves at a precision of 0.03, which is the finest so far.
- Moreso, the F1 can make 220 lines per cm while engraving meaning finer resolution and better clarity.
- Lastly, F1 produces high-definition engravings that make others a bit inferior when compared.
Why should you trust us?
We are recommending based on the hands on tests. We have all of the infrared laser module mentioned above that have been used in many laser enrgaving projects at our workshop. Moreover, our CNC professionals are well-experienced in determining the gaps between so many choices available in the market.
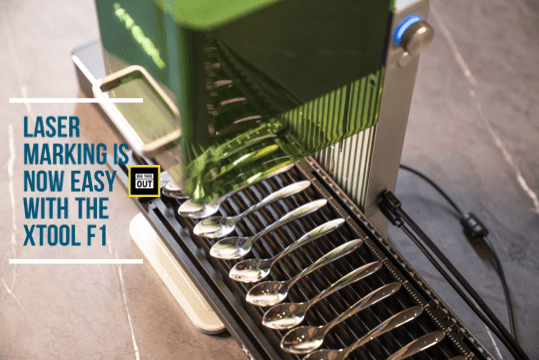
xTool F1 (The most updated infrared laser machine)
The xTool F1 handheld laser engraver is a standout device in today’s laser engraving market. Given my personal experience with this machine, I’d say it offers a unique combination of speed, precision, and convenience that’s hard to find elsewhere.
Here’s a straightforward look at what makes this engraver shine and where it falls a little short.

Positive Sides
The swiftness of the xTool F1 is remarkable – it engraves at about 4000 mm/second. This can dramatically decrease the time required for projects, facilitating businesses to deliver to customers faster. Such efficiency is not just a claim but affected by me handling rush orders much easily, where its speed was a make-or-break factor.
With a precision rated at 0.002 mm, detail is another area where the F1 excels. When using this precision on delicate materials like gold, each engraved pattern emerged crisp and detailed, surpassing those from competitors like the LaserPecker or the Atomstack M4. The auto height and focus adjustment contribute to this resolution, producing high-quality work without the user constantly tinkering with the machine.
Notably, upgrades offered by xTool fare well in enhancing the engraver’s capabilities too. The F1 can expedite engraving on cylindrical objects, all thanks to its add-on rotary attachment. When engraving tumblers, for instance, the rotary makes it seamless. Don’t forget the smoke purifier; it effectively removes smoke and fumes, important when working in a confined space or residential setting.
Another winning feature is dual-module capability allowing different materials to be engraved using optimized laser sources, seamlessly switching between them. Metal annealing done by the 2W IR laser helps in marking metals precisely without altering the integrity of materials, which I confirmed while engraving stainless steel.
Negatives
Despite its robust features, the xTool F1 isn’t without its limitations. Its build is not completely enclosed, so extra care is needed around it for safety, especially compared to fully enclosed engravers. Regarding force, its diode lasers don’t quite match up with that of the CO2 lasers, meaning heavier-duty tasks might not be feasible, as I noticed when attempting to cut thicker balsa wood.
Laserpecker 4 (diode + infrared combo)
LaserPecker 4, the portable laser engraver, makes a bold statement with its performance by offering a swift engraving speed of 2000 mm/s and outstanding 8K HD resolution quality. Designed for simplicity and precision, it engraves with an accuracy of 0.003 mm, setting a new benchmark that slightly surpasses the Atomstack M4.

Positive Sides
Among its notable features, the LP 4 boasts a dual laser system that includes a 10W blue diode laser for general material engraving and a 2W IR laser, ideal for hard materials like metals and plastics. This versatility means effortless switching between jobs, like moving from leather to stainless steel without missing a beat; increasing productivity and precision, especially since repositioning materials can often lead to alignment issues.
Engraving flexibility is further enhanced thanks to the LP 4’s unique rotation capability, allowing engraving at any angle without the need to adjust the positioning of the object. This feature shines when direct engraving on sensitive materials or vertical objects, like a cylindrical vase, is required, and it is a standout capability not found in competitors like the xTool F1.
The user interface is another benefit, with a small touchscreen enabling easy navigation and convenience. Also ideal for batch processing, the LP 4 opens opportunities for efficiency, although within some limits.
Additionally, safety measures include tilt protection, triple laser filters, overheating protection, and an emergency stop feature, offering peace of mind and enhanced protection during operations.
Negative Sides
Limitations are present, where the device can’t cut through thick wood beyond 8mm, a downside for those handling heftier materials. The working bed height is maxed out at 160mm, presenting a challenge for sizeable items. Batch processing, while possible, is restricted to a smaller number of tasks, which could be a bottleneck for large volume productivity demands.
In essence, the LaserPecker 4 positions itself as a powerful, portable, and smart engraver that focuses on enhancing the engraving experience through speed, accuracy, and innovative features. It certainly holds its ground against alternatives in the market, offering ease and quality for both professionals and enthusiasts alike.
xTool 1064 nm IR laser module
If you want to upgrade your existing laser to an infrared laser, then the xTool’s Ir laser module can be a great choice. But, this module only works with their own laser machine.
Which means, if you have an old xTool laser (such as D1 pro, or an S1) then the upgradation worth giving a try. However, if your laser machine is from another brand, you better need to check whether that manufacturer have any upgrades available.

Overall, this IR laser upgradation can be a great choice if you have an old D1 and wishing to switch it into infrared laser.
However, this module will not work with other laser machines, which is mainly a marketing trick done by the company.
While testing this IR laser module, a persistent problem was that some areas didn’t get fully cleared by the laser, leaving blotches and making our artwork look less precise.
Additionally, the amount of time the machine took was daunting. Engraving my designs sometimes took over three full days, even then not removing all the paint, and being present for such a long-duration project without breaks is not practical. Although the machine can etch bare metal somewhat fine, it still works very slowly compared to fiber or CO2 lasers I’ve tried, which finished the work in minutes.
So, upgrading with this module can save your money, but investing in an F1 would be grat deal in terms of saving time.
Sculpfun IR 2 laser module
Sculpfun IR 2 is comparably cheaper than the xTool’s IR laser module. It creates laser wavelength at 1064 nm which is absolutely fine for engraving metal and plastics.
The Sculpfun IR 2 engraves at a precision of 0.03 mm which is slightly inferior than the F1 but pretty awesome if you compare the engravings with xTool’s Ir laser module.
However, you need to change the adopter if you are using a Sculpfun 12V machine since this IR laser module is a 24V version. This is often ignored by the users and they fall into trouble. (Make sure to change the adopter again if you are switching back to the old laser otherwise the entire set up will get burnt)

Check Sculpfun’s official store for price & other compatibility issues.
Consider these before switching to an infrared laser
Before you buy an infrared laser engraver, think about these key points to ensure you make the best choice for your needs.
In summary, the considerable issues are:
First things first, determine what materials you’ll be engraving since infrared lasers are particularly good with certain types. Unlike their CO2 counterparts, infrared lasers can effectively mark metals like gold and silver without additional marking solutions. For example, jewelers often prefer these for detailed work on fine metals.
Consider the size and scope of your projects. If you create small, detailed pieces, a smaller machine might be fine. But if you’re scaling up or looking to engrave larger items, then a laser with a more substantial work area is a must-have. I learned this the hard way when a compact model I purchased couldn’t handle my larger designs, and upgrading to a larger engraver became unavoidable.
Power output is critical. An engraver’s power, usually listed in watts, dictates the speed and depth of engraving. While delicately etching on softer materials might require less power, hard materials demand a more powerful laser. As someone who regularly switches materials, investing in a laser that offered a bit more power than I thought I’d need turned out to be a wise decision, saving time and accommodating wider material choices.
Don’t forget safety and ease of use. An engraver with built-in safety features could be a lifesaver, especially when I had a near miss with an overheating issue. A model with auto-shut-off, overheat sensors, or protective housings can make a huge difference. Also, software compatibility matters; the software should be intuitive—not something that feels like you need a PhD to operate.
Cost-effectiveness is another aspect. Sure, infrared lasers can be steeper in price, but for their longevity and quality, they can be worth the investment. When compared to other types, infrared models often lead to cleaner, more precise markings, reducing errors and material waste—something I value highly in my work.
In terms of lifespan and maintenance, go for quality-built machines that promise durability. Replacing parts or constant repairs disrupt projects and can add hidden costs, something I’ve faced with less sturdy models.
Finally, consider customer support and warranty. The difference between troubleshooting with accessible and knowledgeable customer support versus going at it alone can be stark. With a trusted company’s backup, resolving issues becomes smoother, as was my experience when a quick support call provided a simple fix for a calibration issue I was facing.
In a nutshell, your decision to purchase an infrared laser engraver should be informed by a thorough assessment of your engraving needs, from the types of materials to the power that will make your work both efficient and precise.
Always look into the engraving area size and make sure it aligns with the projects you have in mind. A misjudgment here can limit your creative potential or, as I experienced, end up costing more in the long run for necessary upgrades.
Factor in the power requirements based on the materials you work with. A powerful laser is a valuable asset in your workflow, reducing engraving time and enabling work on tougher materials.
Focus on safety and compatibility too. An engraver that offers protective features and pairs well with user-friendly software can make the difference between a seamless process and endless frustration. Remember how the right software features simplified my process, increasing productivity without the need for constant technical deep-dives.
Don’t be swayed by the initial price alone; consider the running and maintenance costs intertwined with the quality and durability of the machine. Going the extra mile for a dependable, well-reviewed engraver can keep life stress-free compared to the perils of frequent breakdowns and part replacements.
Lastly, never underestimate the peace of mind that good customer support and a steadfast warranty can provide. Committing to a laser engraver that comes with responsive technical help and service guarantees can alleviate potential headaches. Take this from someone who’s been down the path of laser tech no man’s land when a machine goes awry—it’s the customer service at the end of the line that can either make or break your experience.
